To install Microsoft Office on Windows 7 Professional, insert the installation CD and follow the prompts to install the software. Installing Microsoft Office on Windows 7 Professional can improve your productivity by providing access to essential productivity tools such as Word, Excel, and PowerPoint.
If you have recently invested in a new PC that runs on Windows 7 Professional or you are upgrading to the latest version of Microsoft Office, you will need to install the software on your computer. This article will guide you through the step-by-step process of installing Microsoft Office on Windows 7 Professional.
Whether you have a physical installation CD or a digital download, this tutorial covers everything you need to know to get up and running with Microsoft Office on Windows 7 Professional.
Check System Requirements
Before installing Microsoft Office on Windows 7 Professional, it’s important to check the system requirements to ensure compatibility.
| Processor and RAM requirements: | A 1 GHz or faster processor and 2 GB RAM (64-bit), and 1 GB RAM (32-bit) are required. |
|---|---|
| Hard disk space requirement: | It requires at least 3 GB of available hard disk space. |
| Display requirement: | A screen resolution of at least 1024 x 768 is recommended. |
Meeting these requirements is crucial to ensure smooth installation and proper functioning of Microsoft Office on your system.
Credit: support.microsoft.com
Uninstall Any Previous Versions Of Microsoft Office
To successfully install Microsoft Office on Windows 7 Professional, it is important to first uninstall any previous versions of the software. To do this, find and remove any previous Office version from your computer system.
It is also important to remove any remnants of the previous installation by opening the Control Panel and choosing Programs and Features. Locate the previous version of Office and click “Uninstall”.
Insert Microsoft Office Installation Disk
Insert Microsoft Office installation disk:
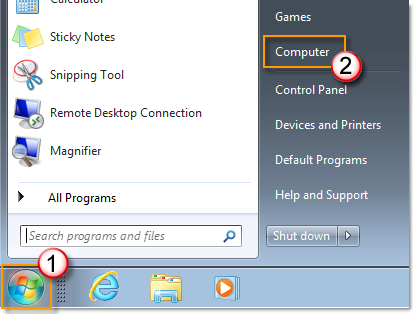
Step 1: Get Microsoft Office installation disk and insert it into the disk drive of your Windows 7 Professional computer. Step 2: Open disk drive: Open File Explorer by pressing Windows+E shortcut key and double-click on the disk drive icon to open the contents of the disk. Step 3: Double-click on setup.exe to start the installation process. Click Yes on the User Account Control prompt to allow the program to make changes to your device. Step 4: Enter your product key and click on Continue. You can find your product key on the packaging or email if you buy Office online. Step 5: Select your preferred installation options and click on Install. Wait for the installation process to complete. Step 6: Click on Close to finish the installation. You can now open any Office application and start using it.
Credit: support.microsoft.com
Run Office Setup Wizard
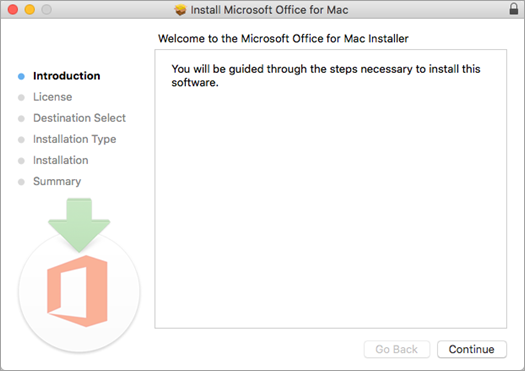
Installing Microsoft Office on Windows 7 Professional is a straightforward process. To run the setup wizard, go to your downloaded Office files and click on setup.exe. From there, you will be given the option to choose between custom or typical installation, depending on whether you want to change any settings or not.
After selecting your preferred installation, accept the license agreement and enter your product key. Once done, the installation will begin automatically. Make sure to keep your product key and license agreement safe as they will be required if you ever need to reinstall Office. With a few simple clicks, you can have your Office suite up and running on your Windows 7 Professional in no time.
Choose Installation Options
To install Microsoft Office on your Windows 7 Professional computer, choose from the various installation options provided on the Microsoft website. These options include purchasing a subscription plan or a one-time purchase, depending on your preference and budget. Make sure to follow the step-by-step instructions provided during the installation process to ensure a successful installation.
Wait For The Installation Process To Complete
After completing the download and installation process of Microsoft Office on Windows 7 Professional, you need to wait for the installation process to complete. It is essential to monitor the installation progress to check whether any error or bug is occurring, and it needs to be resolved. During the installation process, you should not shut down or restart your computer, as it may stop or interrupt the installation. If there is any power shortage, then also it is essential to wait for the power supply to return and not to take any action. After the successful completion of the installation, you can enjoy the benefits of Microsoft Office on Windows 7 Professional.
Activate Microsoft Office
To activate Microsoft Office on your Windows 7 Professional, simply open any Microsoft Office application and follow the activation wizard prompts. You can choose to activate over the internet or phone. If you select internet activation, make sure your computer is connected to the internet and you have a valid product key. If you choose phone activation, enter the installation ID displayed on the activation wizard and follow the prompts to activate Office. Once activated, you can start using Microsoft Office on your Windows 7 Professional computer.

Credit: www.wikihow.com
Verify Microsoft Office Installation
To verify whether your Microsoft Office installation was successful on a Windows 7 Professional, you can open any of the Office applications such as Word, PowerPoint, or Excel. Once you have opened an application, look for the version number located on the top left corner of the screen. The version number will indicate which version of Office you have installed and if it matches the version you intended to install, then the installation was successful.
Frequently Asked Questions Of How Do I Install Microsoft Office On Windows 7 Professional
What Version Of Office Will Run On Windows 7?
Only Office 2010 and newer versions (Office 2013, 2016, and 2019) will function on Windows 7. As of January 2020, support for Windows 7 has ceased, which means microsoft will no longer be releasing security upgrades, patches, or technical support for this ancient OS.
Does Windows 7 Professional Come With Office?
No, Windows 7 Professional does not come with Office. However, you can purchase and install Office separately.
How To Download Microsoft Office 2007 For Windows 7?
To download Microsoft Office 2007 for Windows 7, you need to purchase the software from the Microsoft website or an authorized retailer. Once purchased, you can then download the installation file and follow the on-screen prompts to install the software on your computer.
Is Microsoft Office 2016 Compatible With Windows 7 Professional?
Yes, Microsoft Office 2016 is compatible with Windows 7 Professional.
Conclusion
To sum up, installing Microsoft Office on Windows 7 Professional is a straightforward process that can be completed successfully by following the above-mentioned steps. It is essential to ensure that your computer meets the system requirements before starting the installation process.
By having Microsoft Office installed on your Windows 7 Professional PC, you can enjoy various productivity tools and features that make work easier and more efficient. With the detailed instructions provided, you can now install Microsoft Office on your Windows 7 Professional computer without any difficulty.