To move your desktop icons to the right side in Windows 10, simply click and hold on the icon, drag it to the right side of the screen, and release. Desktop customization is a vital component of personal computer usage for many people.
Arranging desktop icons in a specific order is one aspect users appreciate about Windows 10. People may choose to organize their icons by name, category, or size, depending on their preferences. This order helps people manage their desktop icons efficiently and avoid clutter, making them easy to find what they need.
Moving icons to the right side of Windows 10 can help streamline the icon arrangement on a desktop, providing some users with peace of mind and a sense of organization.
Credit: support.microsoft.com
:max_bytes(150000):strip_icc()/changeiconsize01-81ecb740633d4359816c4e5d9cb81d9f-view-849d053d96434b6e9d7efafc6f357fea.jpg)
Credit: www.lifewire.com
Frequently Asked Questions For How Do I Move My Desktop Icons To The Right Side In Windows 10
How Do I Change My Desktop Icons From Left To Right In Windows 10?
To change your desktop icons from left to right in Windows 10, right-click on any empty area on your desktop, choose “View” from the drop-down menu, and then click “Align icons to grid. ” Your icons will now be automatically arranged from left to right.
How Do I Keep My Desktop Icons On The Right Side?
To keep your desktop icons on the right side, simply right-click anywhere on the desktop and select “Sort by” and then “Name. ” This will arrange your icons in alphabetical order on the right side of the screen. You can also drag and drop icons manually to arrange them as desired.
How Do I Move My Desktop Icons Wherever I Want?
To move your desktop icons, simply click and hold the icon you wish to move, drag it to the desired location on your desktop, and release the mouse button. You can then rearrange your icons however you prefer.
How Do I Change The Orientation Of My Desktop Icons?
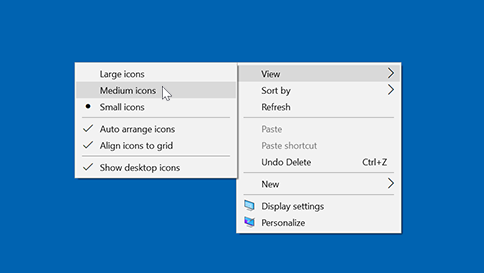
To change the orientation of your desktop icons, right-click on an empty space on the desktop and select “View. ” From there, you can choose between “Large icons,” “Medium icons,” “Small icons,” or “List. ” Additionally, you can choose to “Auto arrange icons” or “Align icons to grid” to further refine the desktop layout.
Conclusion
Moving desktop icons to the right side in Windows 10 is a quick and easy task that can improve your productivity and help you stay organized. By following the three simple methods we have discussed you can easily move your icons to the right side of the desktop and customize their placement according to your preferences.
With the steps mentioned, you no longer need to settle for the default layout and can make your desktop more suitable to your needs. So go ahead and try these methods out for a personalized desktop experience!