To move your iTunes library to another drive on Windows 10, simply copy the iTunes folder to the new location and then redirect iTunes to the new folder in its preferences. Are you running out of space on your Windows 10 device and need to move your iTunes library to another drive?
Fortunately, the process is straightforward and can be completed in a few simple steps. By relocating the iTunes folder and redirecting iTunes to its new location, you can free up valuable space for other files and programs. We’ll guide you through the process of moving your iTunes library to another drive on Windows 10.
Check Available Space On Destination Drive
Before moving your iTunes library to another drive on Windows 10, you must first check the available space on the destination drive. To do so, locate the destination drive on your computer and right-click on it. Then, select “Properties” from the drop-down menu. A window will pop up displaying the drive’s properties. Look for the “Free space” value to see how much space is available. Keep in mind that your iTunes library may be large and may require a significant amount of space on the destination drive. Ensure that there is enough space available to accommodate your library before proceeding.
Consolidate Itunes Library
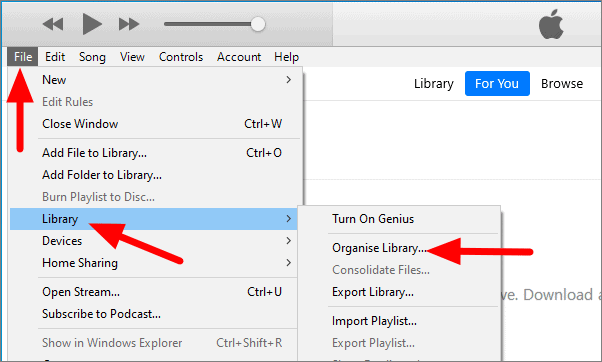
To move your iTunes library to another drive in Windows 10, follow these simple steps:
| 1. | Open iTunes |
| 2. | Go to Preferences |
| 3. | Select Advanced |
| 4. | Tick the ‘Consolidate files’ checkbox |
| 5. | Click OK |
By consolidating your iTunes files, all of your music, videos, podcasts, and other media will be stored in one location, making it easier to transfer everything to a new drive. This process may take some time depending on the size of your library. Once it’s complete, all of your media will be stored in one central location ready to be moved to any drive you choose.
Locate And Copy Itunes Library File
To move your iTunes library from one drive to another on Windows 10, you first need to locate the location of your iTunes library file. This file is where all your media and iTunes data are stored. To find this file, you can open iTunes and go to Edit > Preferences > Advanced. Here you will see the location of your iTunes library file. Simply make a note of this location.
Next, you need to copy your iTunes library file to your new drive. To do this, go to the location of your iTunes library file and copy it. Then, navigate to the new location where you want to move your iTunes library and paste the file. You will be asked if you want to replace the existing file, click on yes.
Now that you have copied your iTunes library file to the new drive, you need to tell iTunes where it can find the new location. Open iTunes and go to Edit > Preferences > Advanced. Here, change the location of your iTunes library file to the new location where you pasted the file.
Change Itunes Media Folder Location
To change the location of your iTunes library on Windows 10, open iTunes and click on “Edit” followed by “Preferences”. Select “Advanced” and click on “Change”. Navigate to the destination drive and select the “iTunes Media Folder”. Click on “Ok” and then “Ok” again to save the changes. This will move your iTunes library to the new drive.
Import Itunes Library File
To move your iTunes library to another drive on Windows 10, you need to import the iTunes Library File. Open iTunes while holding SHIFT key down. Choose the ‘Choose Library’ option. Navigate to copied iTunes Library File and select iTunes Library File. This will import your iTunes library to the new drive. This process is helpful in freeing up space on your computer’s hard drive without losing your iTunes library data. Make sure that you copy the entire iTunes folder and not just the iTunes Library.itl or iTunes Music Library.xml files. Successfully importing the iTunes library file to the new drive will allow you to access all your music, movies, TV shows, and other content.
Credit: softkeys.uk
Wait For Itunes To Finish Importing Library
First, you need to open iTunes and wait until it finishes importing your library. During this process, you need to avoid any kind of interruption or change in your library location.
Once the importing process is completed, exit iTunes to avoid confusion. This will help iTunes to save all changes and sync with your new library location.
Now go to your existing iTunes library location and copy the entire folder containing your library files and migrate it to your desired location drive.
After moving the folder, relaunch iTunes by pressing down the SHIFT key while clicking on the iTunes icon. This will open the iTunes library window, where you need to select the “Choose Library” option from the File menu.
Select your newly created iTunes library folder from its new location and click on the “Open” button. This will bring back your entire library with metadata and playlists to your new location.
Delete Old Itunes Library Files
Moving your iTunes library to another drive in Windows 10 can make your computer run faster. To do this, you can delete old iTunes library files that are no longer needed. This process may require some technical knowledge, so it’s recommended to proceed with caution.
To move your iTunes library to another drive on Windows 10, you need to start by getting rid of the old library files. These are usually located in the Music folder. Locate the old library files in the Music folder and delete them. You can do this by right-clicking on the files and selecting Delete, or by dragging them to the trash. Once you have deleted the old files, you are ready to transfer the library to the new drive. Be sure to back up the library before proceeding, and make sure the new drive is properly formatted and connected to your computer. Copy the iTunes library to the new drive, and then tell iTunes where to find the new library. With these steps, you can successfully move your iTunes library to another drive on Windows 10.
Credit: m.youtube.com
Restart Itunes And Confirm Library Has Been Moved
To move your iTunes library to another drive in Windows 10, you need to restart iTunes and confirm that your library has been moved. After you have moved your iTunes library, follow these simple steps:
| Step 1: | Open iTunes |
| Step 2: | Click on Music |
| Step 3: | Double-check file path to ensure iTunes library has been moved |
By following these steps, you can easily move your iTunes library to another drive on Windows 10 and access your music without any problems. This will ensure that your music collection is safe and secure, even if you change your computer or operating system.
Credit: m.youtube.com
Frequently Asked Questions For How Do I Move My Itunes Library To Another Drive Windows 10
How Do I Move Itunes To Another Drive In Windows 10?
To move iTunes to another drive in Windows 10, first, launch iTunes and select “Edit” > “Preferences” > “Advanced”. Under the “iTunes Media folder location” option, click “Change”. Choose the desired new location on another drive and click “Ok”. Finally, click “Ok” again to save the changes and move your iTunes media library to the new location.
How Do I Move My Entire Itunes Library?
To move your entire iTunes library, you need to first consolidate your library into one location. This can be done by going to iTunes preferences, then clicking on the “Advanced” tab and checking the “Consolidate files” box. Next, locate your iTunes folder and copy it to your new computer or external hard drive.
Finally, open iTunes on your new device and point it towards the copied library.
How Do I Transfer My Itunes Library To Another Computer Using Usb?
To transfer your iTunes library to another computer using USB, connect your USB drive to your old computer, open iTunes, select your library, go to the File menu and choose “Library” then “Export Library”. Save the exported file to your USB drive, connect it to your new computer, open iTunes, and go to the File menu and select “Library” then “Import Playlist”.
Choose the exported file from your USB drive and iTunes will transfer the library to your new computer.
How Do I Transfer My Itunes Playlists To A New Computer?
To transfer iTunes playlists to a new computer, you must first find the iTunes folder on your old computer and copy it to an external drive. Then, you must transfer the folder to your new computer and open iTunes to import the playlists.
Finally, sync your devices to complete the process.
Conclusion
In just a few easy steps, you can easily move your iTunes library to another drive in Windows 10. This allows you to free up space on your computer without losing your music, movies, and other media files. By following the steps outlined in this post, you can avoid the headache of losing your data or having to constantly manage storage space.
With these simple instructions, you’ll be able to enjoy your iTunes library hassle-free.