To reinstall Windows 10 on your Dell computer, you need to follow these simple steps. Firstly, go to the Windows 10 download page and select the option to create a bootable USB or DVD.
Then, insert the USB or DVD into your Dell computer, restart it, and select the option to boot from the device. Finally, follow the on-screen instructions to complete the installation process. If your Dell computer is experiencing technical difficulties or running slow, it may be time to consider reinstalling Windows 10.
This can help to improve performance and eliminate any issues that may be impacting your computer. We’ll guide you through the process of reinstalling Windows 10 on your Dell computer. Whether you’re a tech-savvy user or new to troubleshooting computer problems, these steps will help you reinstall Windows 10 quickly and easily.

Credit: www.dell.com
Preparing For Reinstallation
To reinstall Windows 10 on your Dell computer, it is necessary to prepare for the reinstallation process. Start by backing up important data such as documents, pictures, and videos to an external hard drive, cloud storage, or USB drive to ensure that no data is lost during the reinstallation process.
The next step is to create a recovery drive by downloading and installing the Media Creation Tool from the Microsoft website. This tool allows you to create a bootable USB drive or DVD that will allow you to install Windows 10 on your Dell computer.
Before proceeding with the reinstallation, it is important to check the hardware compatibility of your Dell computer with the Windows 10 operating system. Visit the Dell website and enter your computer model to determine if it is compatible with Windows 10 or not. If it is not compatible, it is recommended to upgrade your hardware before proceeding with the reinstallation.
Credit: www.dell.com
Download And Install Windows 10
To reinstall Windows 10 on your Dell computer, you must first download the ISO file from the official Microsoft website. Ensure that you choose the same edition and language of Windows 10 as your currently installed version. Once the ISO file is downloaded, you can create a bootable USB drive using a tool like Rufus or the Media Creation Tool provided by Microsoft. This will erase all the data on the USB drive, so make sure you backup any important files before proceeding. Once the USB drive is ready, restart your computer and access the boot menu. Choose the USB drive as the boot option and start the installation process. Follow the prompts to complete the installation and customize options like language settings and partitioning. Once the process is complete, your Dell computer will be running a fresh installation of Windows 10.
Post-installation Tasks
After performing a Windows 10 reinstallation on your Dell computer, there are a few post-installation tasks that you need to complete. These tasks include updating drivers, installing software, and configuring settings to ensure that your computer runs smoothly.
After reinstalling Windows 10 on your Dell computer, it’s essential to perform post-installation tasks to ensure your system’s efficient performance. Begin by installing the necessary drivers, including graphics, audio, and network drivers. This will enable your computer’s hardware components to function correctly. Next, install all available updates to ensure optimal performance, security, and stability. Installing antivirus software is a crucial step in protecting your computer from malware attacks and securing your online activities. Regularly updating your antivirus software will ensure maximum protection against new security threats. By following these post-installation tasks, you can enjoy a seamless and more secure computing experience.
Credit: www.dell.com
Data Restoration
Reinstalling Windows 10 on a Dell computer can be a wise step to restore its performance. Nevertheless, you might lose your important data while reinstalling Windows 10. To prevent this from happening, it’s crucial to make a backup of your data before reinstalling Windows 10. Once installation completes, you can start restoring your data. Use an external hard drive or a cloud storage service to Transfer Backup Data. Afterward, configure applications, such as web browser and email clients. You may not want to lose personalized settings and configurations, so Restore User Profiles by following simple steps. Doing so will save you from the headache of starting from scratch.
| Step | Description |
|---|---|
| Step 1 | Open the Settings app and click on the Accounts option. |
| Step 2 | Select the Family & other people tab and click on the Add someone else to this PC option. |
| Step 3 | Choose the “I don’t have this person’s sign-in information” option. |
| Step 4 | Click on the “Add a user without a Microsoft account” option. |
| Step 5 | Type a username and password in the required fields and click the Next button. |
| Step 6 | Now sign in to this new account and head to the C:\Users\OldUsername folder. |
| Step 7 | Copy all files to the corresponding C:\Users\NewUsername folder. |
Optimization Techniques
If you want to reinstall Windows 10 on your Dell computer, there are several optimization techniques you can use to ensure a smooth and efficient process. One of the most important steps you can take is to disable any unnecessary apps that may be running on your computer. By doing so, you can free up valuable system resources and prevent these apps from interfering with the reinstallation process.
Additionally, customizing your settings can help you optimize your computer even further. For example, you can adjust your power and sleep settings, optimize visual effects, and configure your desktop background for maximum efficiency.
Finally, cleaning up your disk space is essential for ensuring a successful reinstallation. By removing any unnecessary files and programs, you can free up valuable disk space and make room for the new operating system. You can use the built-in Disk Cleanup tool to find and remove these files, or use a third-party program for more advanced cleaning options.
| Optimization Techniques | |
|---|---|
| Disable Unnecessary Apps | Free up valuable system resources and prevent apps from interfering with the reinstallation process |
| Customize Settings | Adjust power and sleep settings, optimize visual effects, and configure the desktop background for maximum efficiency |
| Clean Up Disk Space | Remove any unnecessary files and programs to make room for the new operating system |
Common Issues And Solutions
If you’re facing issues with reinstalling Windows 10 on your Dell computer, you’re not alone. Here are some common issues and their solutions:
Activation Issues
- If you changed the hardware of your computer, you’ll need to reactivate Windows 10. You can do this by going to Settings > Update & Security > Activation and clicking on “Troubleshoot”.
- If you’re still facing activation issues, try running the Activation Troubleshooter by going to Settings > Update & Security > Activation and clicking on “Troubleshoot”.
Driver Compatibility Issues
If your computer hardware is not compatible with the drivers of the previous version of Windows 10, you may face driver compatibility issues. You can try the following:
- Update drivers – Visit Dell’s support website and download the latest drivers for your computer model.
- Rollback drivers – Go to Device Manager, select the device with the driver issue and click on “Properties”. Click on the “Driver” tab and select “Roll Back Driver”.
Performance Issues
If your computer is slow after reinstalling Windows 10, you may try the following:
- Clean up junk files – Use the built-in Disk Cleanup tool in Windows 10 to remove temporary files, system files, and other unnecessary files.
- Disable startup programs – Use Task Manager to disable programs that launch automatically when you start your computer.
Frequently Asked Questions For How Do I Reinstall Windows 10 On My Dell Computer
How Do I Reinstall Windows 10 Operating System?
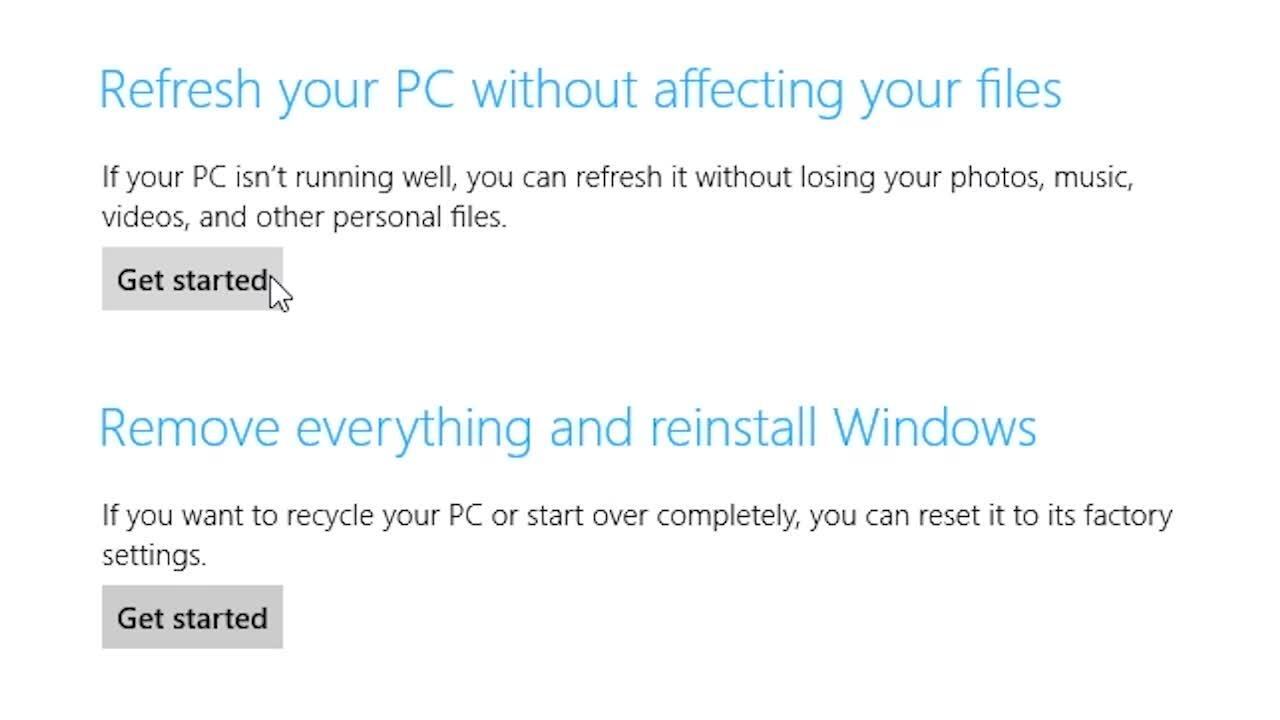
To reinstall Windows 10 operating system, click on the Start menu, then select Settings and go to Update & Security. From there, choose Recovery, then click on Get started under Reset this PC. You will have the option to keep or remove your personal files and apps, and then follow the on-screen instructions to complete the reinstallation process.
How Do I Factory Reset Windows 10 Reinstall?
To factory reset Windows 10, go to Settings > Update & Security > Recovery, and click on “Get started” under Reset this PC. Choose to either keep or remove files and reinstall Windows.
What Is The Recovery Key For Dell Windows 10?
The recovery key for Dell Windows 10 is a unique 25-character code that is used to access and restore your system in case of a software breakdown or virus attack. It is generated and updated by the Windows recovery environment and is required to reset your PC to its default settings.
How To Reinstall Windows 10 Without Usb Or Disk?
You can reinstall Windows 10 without a USB or disk by resetting your PC in the settings. Go to “Settings”, then “Update & Security”, “Recovery”, and click “Get Started” under “Reset This PC”. Choose “Remove everything” and follow the prompts to complete the reinstallation process.
Conclusion
Reinstalling Windows 10 on your Dell computer can be a daunting task. However, with the right steps, it can be accomplished easily and quickly. Follow the steps provided to create a bootable USB or DVD, backup your data, and initiate the reinstallation process.
Remember to keep your license key handy for activation. With a little patience and careful execution, your Dell computer will soon be up and running in no time.