To set up an Ethernet connection on Windows 10, go to the “Network & Internet” settings and select “Ethernet” to configure the settings. Now, let’s dive into the steps!
Ethernet is a popular method of connecting devices to the internet as it can provide a stable and reliable network connection. If you have a Windows 10 computer or laptop, setting up an Ethernet connection is a straightforward process. We will guide you through the steps to connect to the internet using an Ethernet cable.
By the end of this article, you will be able to connect to the internet and enjoy stable internet speeds using an Ethernet connection on your Windows 10 device. Let’s get started!
Check If Your Computer Has An Ethernet Port
If you want to set up an Ethernet connection on your Windows 10 computer, the first step is to determine whether your device has an Ethernet port. To do this, inspect the exterior of your machine for a distinct port that looks like an enlarged telephone jack. Alternatively, search your computer’s manual or online documentation for details on how to locate the Ethernet port.
Be aware that there are many different types of Ethernet ports, each with its own design and capabilities. Some Ethernet ports, for instance, come with a lock that keeps the cable securely in place, while others feature a release mechanism that makes it easier to unplug the cable. Moreover, certain Ethernet ports support high-speed Gigabit Ethernet data transfers, while others only offer slower speeds.
Credit: www.thewindowsclub.com
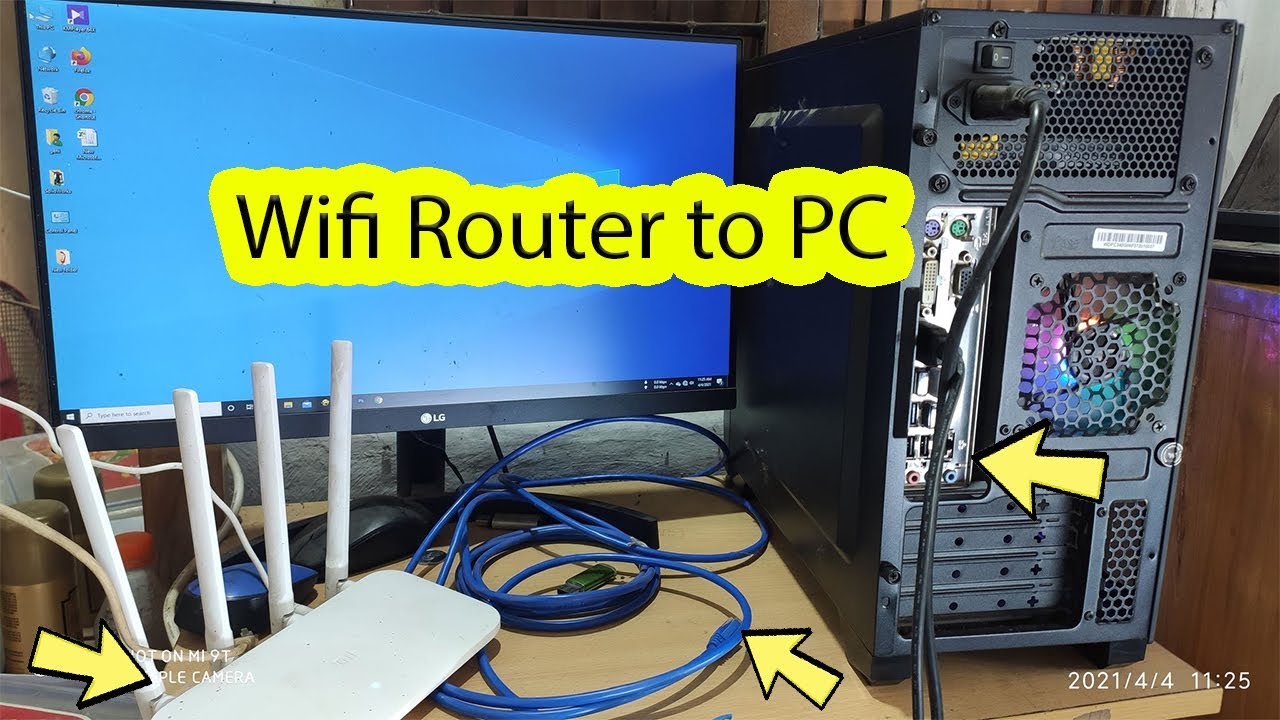
Connect Your Computer To The Router Or Modem
Connecting your Windows 10 computer to the router or modem via Ethernet is a simple process. First, locate the Ethernet port on your computer and connect it to the appropriate port on the router or modem. Next, follow the on-screen prompts to complete the setup process.
To set up an Ethernet connection on Windows 10, power off your devices. Then, connect an Ethernet cable from your router/modem to your computer. Finally, turn on your devices. By doing this, you will have a stable and fast internet connection. Make sure to check the cable connection and click on the Ethernet icon in the taskbar to access the internet. With Ethernet, you don’t have to worry about Wi-Fi dead zones or slow internet speeds. It is a reliable and secure way to connect to the internet. With these simple steps, you can enjoy the benefits of Ethernet connectivity on your Windows 10 device.Configure Ethernet Settings On Windows 10
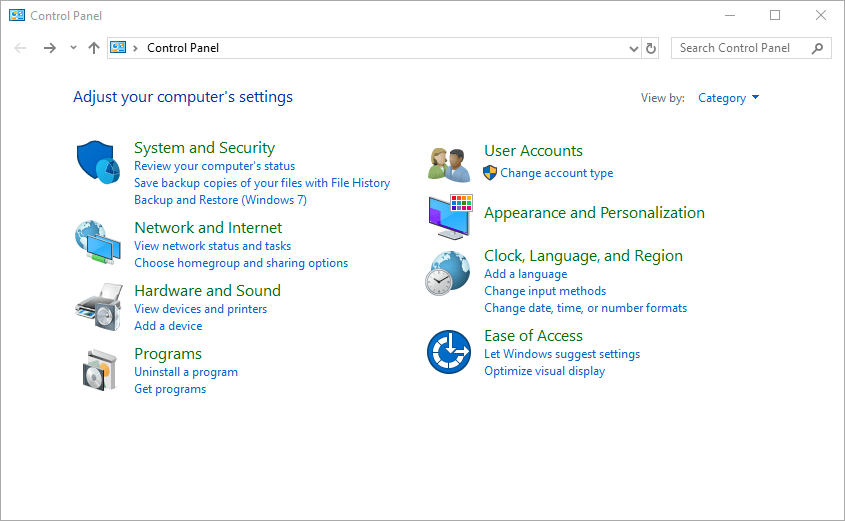
To set up an Ethernet connection on Windows 10, follow these steps:
| 1. | Open the Settings menu by clicking on the Start menu and then clicking on the gear icon. |
| 2. | Select Network & Internet from the list of options. |
| 3. | Select Ethernet from the left-hand menu. |
| 4. | Set your Ethernet connection preferences, including whether to allow your computer to turn off the Ethernet adapter to save power and whether to use a metered connection. |
Once you’ve completed these steps, your Ethernet connection should be up and running. If you experience any issues, make sure your Ethernet cable is plugged in securely and that your router is working properly. You may also need to update your network adapter drivers or troubleshoot your network connection using Windows 10’s built-in tools.
Credit: www.youtube.com
Troubleshoot Ethernet Connection Issues
Are you facing issues with your Ethernet connection on Windows 10? Here are some simple steps to troubleshoot the Ethernet connection issues.
Check Ethernet Cable Connection
– Ensure the Ethernet cable is connected to both the computer and the router/modem. – Check for any visible damage on the cable. – Try using a different Ethernet cable to see if the issue persists.Update Network Drivers
– Press “Windows key + X” and select “Device Manager”. – Expand “Network adapters” and right-click on your Ethernet adapter. – Select “Update driver software” and choose to search automatically for updated driver software.Change Network Adapter Settings
– Press “Windows key + R” and input “ncpa.cpl” to open “Network connections”. – Right-click on your Ethernet adapter and select “Properties”. – Click on “Configure” and then “Advanced”. – Change the “Speed & Duplex” option to “100 Mbps Full Duplex” or “10 Mbps Full Duplex”.By following these steps, you can easily troubleshoot and set up an Ethernet connection on Windows 10 without any issues.
Credit: ww2.mathworks.cn
Frequently Asked Questions On How Do I Set Up An Ethernet Connection On Windows 10
How Do I Manually Set Up Ethernet?
To manually set up Ethernet, connect your Ethernet cable to your device and to your router or modem. Go to your computer’s network settings and select “Ethernet,” then enter your network information. If prompted, enter your Wi-Fi password and your Ethernet should be connected manually.
How Do I Set Up Ethernet For The First Time?
To set up Ethernet for the first time, follow these steps: 1. Connect one end of an Ethernet cable to your modem/router, and the other end to your device’s Ethernet port. 2. Make sure the Ethernet port on your device is enabled.
3. Check if your device has automatically obtained an IP address. 4. If not, manually configure the IP address. 5. Test the internet connection to ensure Ethernet is properly set up.
How Do I Get My Computer To Recognize Ethernet?
To get your computer to recognize Ethernet, connect the Ethernet cable to your computer’s Ethernet port. Restart your computer and check if it detects the Ethernet connection. If not, update your Ethernet driver or troubleshoot your network settings.
How Do I Connect To Ethernet On Windows 10 Instead Of Wi-fi?
To connect to Ethernet on Windows 10 instead of Wi-Fi, you need an Ethernet cable. Plug one end into your computer’s Ethernet port and the other end into a router or modem. Then, go to “Settings” on your computer, click on “Network & Internet,” and select “Ethernet” to connect.
Conclusion
Connecting your Windows 10 device to an Ethernet connection is a straightforward process that doesn’t require advanced technical knowledge. By following the steps outlined in this guide, you’ll be able to quickly set up your Ethernet connection and enjoy faster internet speeds and reduced latency.
Ethernet is an excellent option for users who need to perform bandwidth-intensive tasks such as gaming, streaming, or downloading large files. So, don’t hesitate to make the switch and experience the benefits of Ethernet technology.