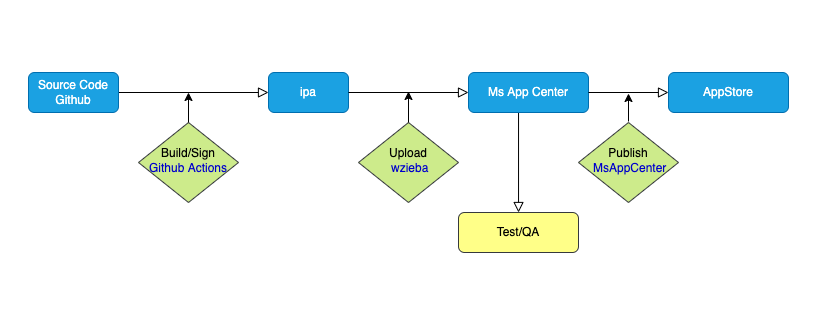
To build an IPA application for React Native iOS, you need to use Xcode and Apple Developer account. After creating a build using Xcode, you can use tools like Fastlane to automate the process and simplify the deployment.
Building an IPA application for React Native iOS requires some technical know-how, but it’s not overly complicated. React Native is a popular framework for creating native mobile applications using Javascript. To deploy the app for iOS, you will need a Mac computer, Xcode, and an Apple Developer account.
Once you have these in place, you can create a build in Xcode and then use tools like Fastlane to streamline the deployment process. We’ll walk you through the steps necessary to build and deploy your React Native application for iOS.

Credit: blog.codemagic.io
Setting Up The Environment
To build an iOS application using React Native, you need to set up your development environment. Here is a step-by-step guide on how to do it.
Install React Native: First, you need to install React Native using the NPM package manager. Use the following command in the terminal to install:
npm install -g react-native-cliSet up Xcode: Install Xcode from the App Store and open it. Install the latest iOS SDK by clicking on Xcode → Preferences → Locations → Command Line Tools → select Xcode.
Set up iOS Simulator: To run your app on the iOS simulator, open Xcode → Preferences → Components to install simulators. To launch the simulator, run the following command:
react-native run-ios --simulator="iPhone X"Now you are ready to start building your iOS application using React Native!
Credit: medium.com
Creating A React Native Project
To create a new React Native project, first, install Node.js and npm on your machine.
- Open a terminal and navigate to a directory where you want to create your project
- Run the command
npx react-native init ProjectNameto initialize a new React Native project.
The project directory will be created with all the necessary files.
Next, add necessary dependencies to the package.json file.
For iOS development, you will need to install Xcode and CocoaPods.
- Open the ProjectName directory in the terminal
- Run
cd ios && pod install && cd .. - This should install all the necessary dependencies for iOS development.
Finally, start the React Native app by running npx react-native run-ios command. This will launch the app in the iOS simulator.
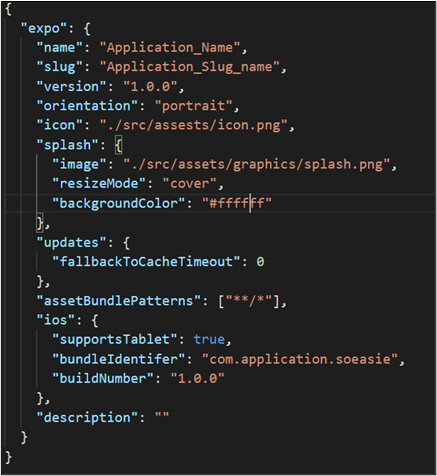
Configuring The Project For Ios
To build an IPA application, you must configure the project for iOS. Follow these steps:
Modify Info.plist: Open Xcode, navigate to the project folder, and open the Info.plist file. Add the necessary keys and values such as Bundle display name, Version, Build, etc.
Modify AppDelegate.m: In the AppDelegate.m file, add code for handling notification-related requests and set up Firebase and other SDKs.
Configure Bundle Identifier: In the Xcode project settings, go to the General tab and update the Bundle Identifier in the Identity section. It should be in reverse domain name notation. For example, com.yourcompanyname.yourappname.
Make sure you have followed all of the above steps correctly for a successful configuration of your React Native iOS application.
Building And Running The Project
To build and run your project, you need to select the target device. Select the device from the dropdown menu that appears in the top left of the Xcode window. If you select a device that is not currently connected to your Mac, Xcode will try to locate it. If it cannot be found, you may need to connect the device manually.
Once you have selected the target device, you can build and run your project by clicking on the play button in the Xcode toolbar. The build process will begin, and the application will be installed onto your device. If everything has been set up correctly, the application should launch automatically on the device.
| Step | Description |
|---|---|
| Select Target Device | Select the device from the dropdown menu in Xcode |
| Build and Run | Click on the play button in the Xcode toolbar to build and run the project |
Adding Native Functionality To The App
Native functionality can enhance the user experience of your React Native app. To add it, you first need to create Objective-C/Swift files for the native module. Once you add the files to Xcode, create a bridge header file to connect the Swift or Objective-C code to JavaScript. After that, link the native module with React Native using the RCT_EXPORT_MODULE macro. You can also pass data between the native module and JavaScript using callbacks. Remember to test your native functionality thoroughly before publishing your app.
Adding native functionality might seem intimidating at first, but with careful planning and execution, it can make your app stand out in a crowded market.
Credit: www.soeasie.com
Testing And Debugging
To build an IPA application for React Native iOS, proper testing and debugging are crucial steps. Before releasing the application, it should be thoroughly tested for any errors or issues. Debugging helps in identifying and fixing any problems found during the testing phase to ensure a smooth user experience.
| Testing the App on Different Devices: |
|---|
| Testing your IPA application on different devices is crucial to ensure that it works on all supported platforms. React Native allows you to easily simulate different devices through the use of emulators. You can also test your app on physical devices connected to your computer. This will help you identify and fix any issues that may arise due to different device configurations and specifications. |
| Debugging the App using Xcode: |
|---|
| Xcode is an Integrated Development Environment (IDE) provided by Apple. It offers a range of tools and features that help developers debug their iOS applications. You can use Xcode’s debugging tools to identify issues in your IPA application such as crashes, memory leaks, and performance problems. You can also use Xcode to set breakpoints in your code, view and edit variables in real-time, and step through your code one line at a time for detailed analysis. |
Conclusion
To conclude, building an IPA application for React Native iOS is an exciting project that requires patience and careful attention to detail. By following the steps outlined in this guide, you can simplify the process and achieve success. Always remember to stay up to date with the latest tools and technologies to keep your app, and your skills, ahead of the game.
With persistence, practice, and a bit of creativity, your IPA app can be the next big hit.